
Failures in a vinyl deck membrane rarely happen overnight. In fact they often begin with seemingly innocuous signs: a small split at a seam, a slightly lifting corner or a soft spot you notice underfoot. Over time, exposure to rain, snow, sun and freeze-thaw cycles can allow water to get trapped below the membrane in the plywood substrate, framing and surrounding building envelope.
And that can spell trouble for strata councils, property managers and commercial building owners alike. Once moisture reaches the substrate or structural components, simply patching or repairing the visible damage may no longer be enough.
This is when a planned vinyl deck membrane replacement becomes the most viable long-term approach. By addressing the membrane, hidden deterioration, flashing and drainage details together, the restoration work can restore a continuous waterproofing system, while reducing the risk of future leaks, and more disruptive repairs down the road.
Why a failing deck membrane is more than just a surface problem
Underfoot, a vinyl deck membrane might seem like little more than a finished surface you walk on. In practice it plays a much bigger role in the waterproofing protection it provides. Installed over a prepared deck substrate, this waterproof PVC layer helps create a durable, slip-resistant walking surface that prevents rain and moisture from reaching the wood and structural components beneath.
That layer of protection matters, because a balcony, sundeck or roof deck is not just an isolated surface. The vinyl decking membrane is part of a building envelope system designed to safely direct water away from the building structure.
When a decking membrane starts to fail, the first visible signs may appear fairly minor. It could be a split or lifting seam, or even a crack, but once water starts to find its way through, it can get trapped – causing rot and damage to the plywood and framing below. Left long enough the damage can spread to the building structure itself.
Moisture can also travel beyond the spot where it first entered, which means the visible “problem areas” do not always indicate the full extent of the damage.
That’s why replacing a vinyl deck membrane often involves more than simply removing the damaged surface and installing another. Once the existing membrane is lifted, the substrate should be inspected for moisture damage or rot, repaired where necessary, and prepared properly before a new waterproofing system is installed. Flashing, drainage, seams and connections to walls and doors also need to be considered as part of the renewal.
When water gets below the vinyl deck membrane
Once water has had a chance to get beneath a vinyl deck membrane, it has very few opportunities to dry out again. The moisture gets trapped against the framing or plywood substrate, which will eventually begin to rot and deteriorate. Now the situation can start becoming a structural problem, eventually reaching fasteners, wall assemblies and even interior spaces below.
To complicate matters, the point where a water leak appears (such as a ceiling stain or soft spot on an interior wall) is not always where it originated. Water can travel along seams, beneath the membrane or through building envelope components before making itself apparent. What looks like one localized leak can therefore require a closer look at the surrounding deck assembly.
The longer the moisture is allowed to make its way through the vinyl membrane and remain hidden, the greater the potential scope of the repair. What might initially have involved patching a membrane or replacing flashing detail can eventually require plywood replacement, carpentry or repairs to other affected parts of the building.
When is repair enough, and when is replacement the better call?
Not every case of a damaged vinyl deck membrane means the whole surface needs to be replaced. A small puncture, isolated seam failure, or lifted edge may be repairable if caught early enough and the surrounding membrane is still in good condition, and the substrate below remains dry and structurally sound.
Age and the overall condition of the deck matter just as much as the size of the visible problem. Repeated water leaks, widespread cracking, brittle or deteriorated vinyl, multiple failing seams, soft areas underfoot, and signs of moisture below the deck can all indicate that a localized repair is unlikely to be sufficient in addressing the larger issue.
At that point, continuing to patch individual trouble spots can become a cycle of short-term fixes that do little to nothing in addressing the underlying structural damage. Full vinyl deck membrane replacement provides an opportunity to remove the existing surface, assess the extent of the damage below it and fix or repair underlying substrate, flashing or drainage problems before installing the new membrane.
For property managers, owners, and strata councils, that broader assessment can also help determine whether work should be approached one deck at a time or planned as part of a larger building renewal project.
Vinyl deck membrane repair vs. replacement
Deciding whether to repair or replace a vinyl deck membrane usually comes down to more than discovering one visible crack or leak. The age and overall condition of the decking membrane, the number of problem areas, the condition of the substrate below, and any signs of ongoing water intrusion all combine to help determine whether a localized repair is still practical, or a more complete replacement is warranted.
| Cases for repair | Cases for replacement |
| Damage is isolated to a small area | Widespread cracking, lifting or seam failures |
| The membrane is still relatively young and otherwise sound | The membrane is nearing or beyond its expected service life |
| Plywood beneath the damaged membrane is dry and solid | The substrate feels soft, spongy or shows moisture damage |
| A single puncture, tear or failed seam can be identified | The source of water intrusion is unclear or extends beyond the visible damage |
| The source of the problem is clear and accessible | Leaks or failures are occurring in multiple locations |
| Flashing and perimeter details seem to be in good condition | Flashing, drainage or connections to walls and doors also need attention |
What does replacing a vinyl deck membrane involve?
So, the leaks and damage is widespread enough that replacing the membrane and addressing the substrate repairs are deemed to be the best course of action. What happens next?
A proper vinyl deck membrane replacement starts with a full removal of the existing surface so the condition of the deck below can be properly assessed. With this surface fully exposed, the plywood and surrounding framing can be checked for moisture, rot, and other deterioration that might have gone unnoticed while the vinyl decking was in place.
Any damaged plywood or framing needs to be repaired or replaced before the new membrane is installed. The deck surface is then prepared to create a smooth, sound base, with attention paid to achieving the appropriate slope and drainage so water can move away from the building rather than collect on the surface.
From there, the new membrane is installed as part of a complete waterproofing system. That includes properly welded seams, perimeter flashing, drains and scuppers, along with careful detailing where the deck meets exterior walls, thresholds and other parts of the building envelope.
These are the transition points where problems often begin, so they deserve just as much attention as the membrane itself. Done properly, the result is not simply a new deck surface, but a renewed waterproofing system designed to protect the structure below for years to come.
Replacing a Vinyl Deck Membrane: Step-by-Step
Replacing a vinyl deck membrane is a multi-stage process, the scope of which can depend on various factors such as the condition of the existing deck, the membrane system being used, and how the deck is connected to the building envelope. There is, however, a general sequence that most projects follow:
- Step 1: Removing the existing membrane
The old vinyl membrane and perimeter details like flashing or trim are removed to expose the bare deck below. This is also the first opportunity to fully assess the true condition of the substrate and identify moisture damage that may not have been visible before.
- Step 2: Inspect and repair the substrate
Once exposed, the plywood and underlying structure can be checked for rot, water damage or other deterioration. Damaged material is replaced or repaired completely before any new waterproofing is installed.
- Step 3: Preparing the deck surface
The substrate or plywood decking needs to be clean, smooth, and properly sloped for drainage. Seams, fasteners and surface irregularities are addressed so the new membrane has a stable, even base. An exposed screwhead, or void in the wood is likely to become a source of future issues if not properly addressed at this stage.
- Step 4: Install the new membrane
The new vinyl membrane is glued to the freshly prepared substrate using the products and installation methods specified for the selected system. Careful placement and rolling help to ensure consistent adhesion across the deck surface.
- Step 5: Weld and seal seams
Where sheets of the new membrane meet, seams are heat-welded to create a continuous waterproof surface. These connections are carefully checked because even a small gap or weakness can become a point of water entry down the road.
- Step 6: Sealing edges and connection points
The final stage of the process involves addressing areas where the deck meets the building envelope walls, doors, drains, scuppers and outside edges. Flashing, trim and membrane terminations are used to direct water away from the building and the waterproofing remains continuous across the entire assembly.
Once these details are complete, siding, trim or other building components that were temporarily removed can be restored and replaced.
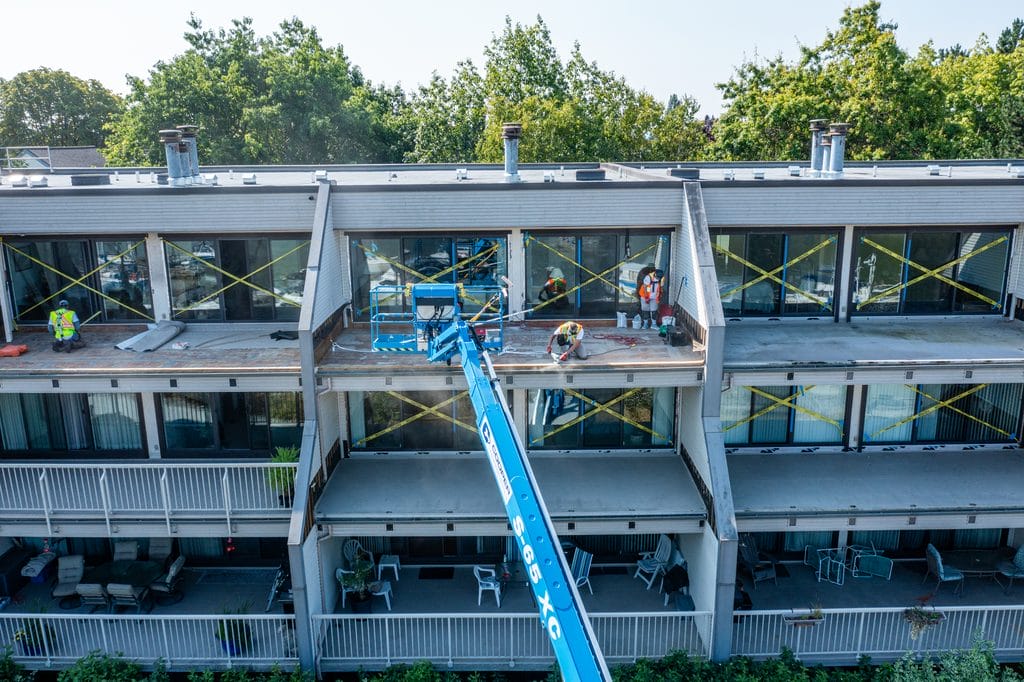
Details that make or break a membrane replacement
A new vinyl membrane is only as good as the surface and detailing beneath it. Even a high-quality decking product can fail prematurely if the substrate is poorly prepared, drainage is inadequate, or water is left to get in around edges, doors or wall connections. Here are some of the most important factors in getting a vinyl deck membrane replacement right.
- A clean, and well-prepared substrate
The new membrane will need a clean, stable and properly prepared surface beneath it. Damaged or deteriorated plywood should be replaced, while seams, fasteners and surface irregularities need to be addressed before installation begins. If the base is uneven, soft or compromised by moisture, covering it with new vinyl will not solve any of the underlying problems. - Proper slope and drainage
Water should move off the deck rather than sit on the surface. Existing drainage issues may need to be corrected as part of the replacement, particularly around drains, scuppers and low points where standing water tends to collect. The longer water is allowed to sit, the more opportunity for deterioration and chances for it to end up going where it shouldn’t. - Careful detailing around walls and doors
Some of the most vulnerable areas are where the deck meets another part of the building. Door thresholds, walls, siding and other transitions need to be properly integrated with the membrane so water cannot work its way behind the waterproofing. - Secured edges and flashing
Open deck edges also need careful attention. Flashing and perimeter details help move water away from adjoining building materials while maintaining a continuous waterproof barrier around the deck. - The right vinyl decking system for the job
Not every kind of membrane is suitable for every deck or substrate. The selected product, adhesives, flashing and installation methods all need to be compatible with the existing deck construction and intended use of the space.
Together, these details are what turn a membrane replacement into a lasting waterproofing solution.
Factors that will affect the cost of vinyl deck membrane replacement
The cost of replacing vinyl deck membranes can vary considerably from one building to another. The size and number of decks involved, the condition of the existing substrate and structure, access to the work area, and the amount of detailing required around doors, walls and drainage will all affect the final cost.
Some of the biggest cost factors include:
- Deck size and number of units
Larger projects require more material and labour, although replacing multiple decks at the same time can create efficiencies.
- Access
Upper-storey balconies or difficult-to-reach areas may require scaffolding, swing stages or other access equipment.
- Condition of the plywood substrate and framing
If moisture has damaged the substrate or structural wood beneath it, those repairs need to be completed before a new membrane can be installed. - Doors and thresholds
Patio doors may need to be temporarily removed or adjusted so the membrane and flashing can be properly integrated.
- Wall finishes
If stucco, siding or other exterior finishes have to be removed and restored, this can add labour, time and complexity.
- Flashing and drainage
Existing perimeter flashing, drains, scuppers or slope issues may also need to be corrected as part of the work.
One of the biggest unknowns when beginning this kind of a project is often what lies beneath the old membrane. Until it is removed, the full extent of moisture damage may not be visible, which is why some flexibility should be built into the project budget.
Request a Free Consultation
Budgeting for vinyl deck membrane replacement
For planning purposes, the outline for a project discussed above in BC estimates complete professional vinyl deck membrane replacement at approximately $18 to $34 per square foot, including old decking removal, preparation, membrane installation, seam welding and perimeter flashing.
That figure is best treated as a starting point rather than a fixed price. Plywood replacement, structural wood repairs, door removal, wall cladding work and specialized access can all affect the final scope of the project.
For strata councils and property managers, it can be useful to separate the budget into two parts:
1. The known cost of replacing the membrane system.
2. A contingency fund for concealed repairs that may only become apparent once the existing deck surface is removed.
On larger buildings, reviewing multiple decks at the same time can also make it easier to prioritize work, plan capital spending, and avoid approaching each failing deck system as a separate emergency.
How to protect your new vinyl decking membrane and extend its life
A new vinyl deck membrane should provide years of reliable protection, but regular maintenance and care still matter. Small issues are easier and less expensive to deal with when they are caught early, before water has a chance to get beneath the surface.
A few simple maintenance habits can help:
- Inspect the deck regularly: Look for signs of split or lifting edges, damaged seams, punctures, cracking or other signs of wear, especially after harsh winters or periods of heavy rain.
- Keep drains and gutters clear: Leaves, dirt and debris can block drainage and allow water to pool on the deck where it can cause issues.
- Protect the new surface from heavy or sharp objects: Use pads beneath planters, furniture and barbecues, and avoid dragging anything that could catch a seam, cut or gouge the membrane.
- Clean gently: Mild soap, water and a soft brush are usually enough. Abrasive tools, aggressive pressure washing and harsh chemicals can damage the surface.
- Mind edges and transitions: Areas around doors, walls, flashing and perimeter details are worth checking because they are common points of water entry.
- Address damage promptly: A small tear or failed seam may be straightforward to repair when caught early, but it can become a much larger problem if water is allowed to penetrate below.
- Keep maintenance records: For strata and commercial properties, documenting inspections and repairs can help with future planning and may also support warranty requirements.
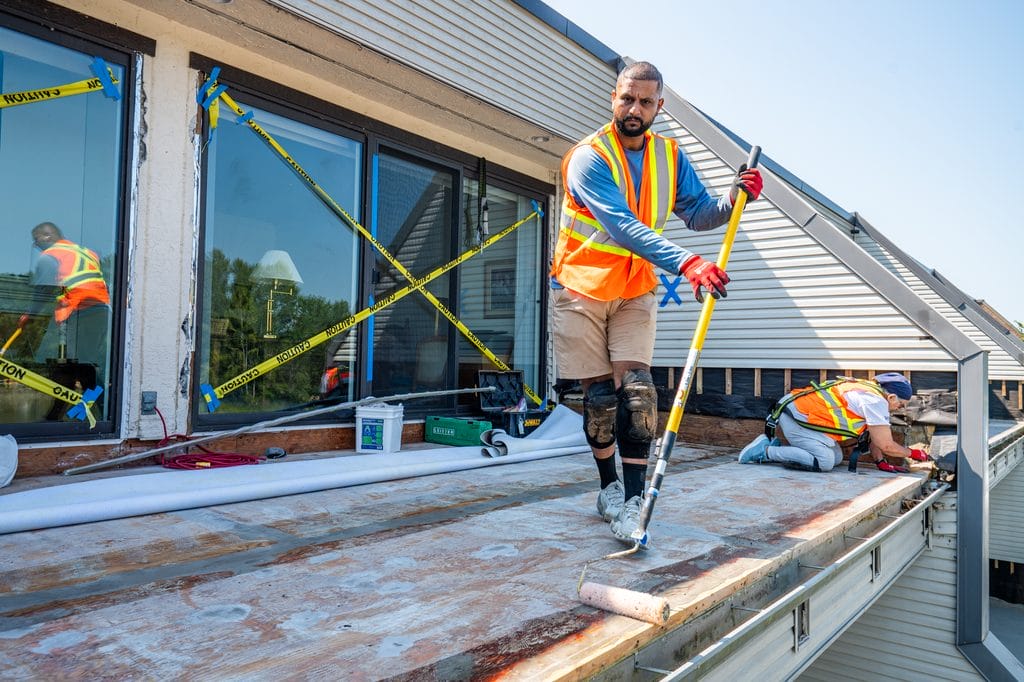
Make it easy for residents and tenants to report small issues
Encourage tenants and occupants to flag things on their decks such as:
+ lifting edges
+ soft spots
+ bubbling under the vinyl
+ pooling water
+ stains on the underside of the deck above them
+ new leaks after heavy rain.
A simple reporting process (ideally with photos) can help building managers investigate minor concerns before they develop into larger and more costly repairs.
Planning membrane replacement for a strata or commercial property
When one deck membrane begins to fail, it’s worth looking at beyond that one situation. If other balconies or decks were installed at the same time and have had similar exposure, they may be approaching the same stage of wear and viability.
For strata councils, property managers and commercial owners, a broader condition review can help identify which decks need immediate repairs or attention, which can be monitored, and which may be better addressed as part of a planned renewal program.
There are practical advantages to coordinating the work. Grouping multiple decks into one project may reduce repeated setup and access costs, simplify the scheduling, and make it easier to plan around workers residents, tenants and building operations alike.
For larger properties, the work can also be phased over time. Depreciation reports, maintenance records and inspection findings can help establish priorities, while allowing for contingency where hidden moisture damage may affect the final scope.
Clear communication matters
Residents and tenants should know when access will be required, what areas may be temporarily unavailable, and how long the work is expected to affect their use of the space. The more predictable the process is, the easier it is to manage a larger renewal project without turning every repair into an emergency.
Planned renewal vs. reactive (and repeating) repairs
There is a big difference between replacing vinyl decking membranes as part of a planned renewal and dealing with constant repairs and replacements after water damage has already spread below the surface, affected surrounding areas and even caused leaks in the building itself.
A planned approach gives strata councils, property managers and commercial owners more control over timing, budgeting and disruption. It also creates the opportunity to assess related decks, address underlying issues properly and coordinate the work before leaks become emergencies.
Reactive repairs, by contrast, often begin with an urgent leak and end with a much larger scope once the membrane is removed. The earlier the condition of the damage is understood, the more options there are for managing the work on your own terms.
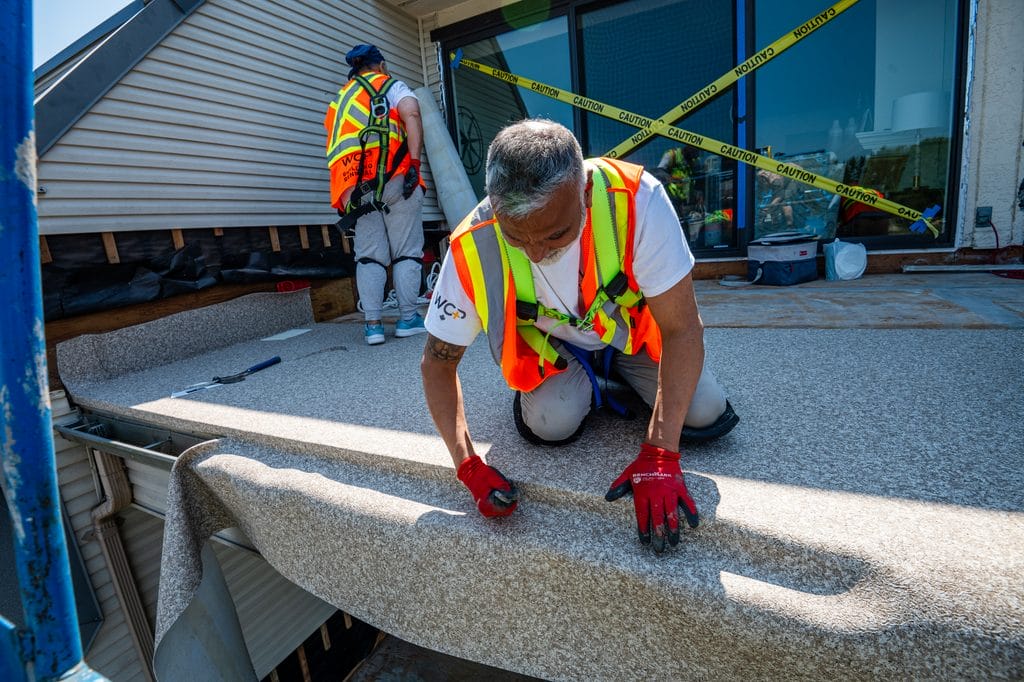
Protecting your new vinyl decking membrane warranty
A new vinyl decking membrane is a significant investment, especially if there are multiple units involved. It’s worth understanding what factors can affect the warranty before the work begins. Coverage limitations can vary by the manufacturer and product, but installation methods, compatible materials, ongoing maintenance, and documentation can all play a role.
A few things can help protect your warranty coverage:
- Use qualified installers: The membrane should always be installed by experienced professionals who follow the manufacturer’s approved procedures and use compatible glues and other system components.
- Follow product requirements: Adhesives, primers, flashings, trims and seam details should all meet the specific technical requirements of the membrane system you’re installing.
- Maintain the membrane: Regular cleaning and inspections can help catch damaged seams, holes, drainage issues and other problems before they become more serious.
- Keep good records: Property managers and strata councils should document all inspections, tenant concerns, maintenance, repairs and renewal work where required.
- Review the warranty terms: Warranty coverage and conditions can vary, so it is important to understand all installation, maintenance, and inspection requirements tied to the specific product.
A properly installed membrane still needs proper care over the long term. Following the manufacturer’s requirements from the outset can help develop strong maintenance and inspection routines, preserving both the waterproofing system and its warranty.
Frequently Asked Questions
1. How long should a vinyl deck membrane last in BC?
A well-installed vinyl deck membrane can provide many years of service, but an individual system’s lifespan depends on the specific product, exposure, installation quality, use conditions, and ongoing maintenance. Regular inspections and prompt repairs can help extend its useful life.
2. Can a new vinyl deck membrane be installed over an old one?
In most cases where replacement is deemed necessary, the existing membrane should be removed so the substrate can be properly inspected and prepared. Installing new vinyl over old material can simply cover up moisture damage (which often results in further damage), interfere with adhesion, and make it more difficult to assess the condition below.
3. How does BC’s weather affect vinyl deck membranes?
BC can deliver extreme weather conditions, including heavy rain, dampness, UV exposure, and freeze-thaw conditions, all of which can contribute to wear over time. Small cracks, failed seams or damaged edges can become more serious when moisture is allowed to work its way beneath the surface.
4. Who is responsible for balcony deck replacement in a BC strata?
Responsibility for vinyl deck membrane replacement can depend on how the balcony or deck has been designated in the strata plan and bylaws. It may be common property, or limited common property – so strata councils should review all applicable documents and requirements before planning major work.
5. What maintenance factors help a vinyl deck membrane last longer?
Regular cleaning (mild detergent, avoid heavy power-washing), keeping drains clear, checking seams and edges, protecting the surface from sharp or heavy objects, and addressing damage promptly can all help extend the life of the membrane.
Take the first steps toward making an informed decision about your vinyl deck membrane project
A well-planned vinyl deck membrane replacement does more than just restore the surface. It helps protect the structure below, reduces the likelihood of recurring leaks, and gives property managers and strata councils a clearer path for managing future maintenance and renewal.
If you’re seeing signs of decking membrane failure or planning ahead for upcoming deck renewal, WCP Building Renewal can assess the condition of your decks, help determine the appropriate scope of work, and coordinate repairs or replacement across your property.
Talk to us about your vinyl deck membrane concerns
To learn more about vinyl deck membrane repair or replacement for your strata or commercial property, contact WCP Building Renewal at [email protected] or call 604-420-5552.
Get in touch today to book a no-pressure, no obligation consultation.


