Materials like lead and asbestos were once common in many forms of construction. Once praised for their durability, fire resistance, and insulation properties, today, they’re known as health hazards that require careful handling and professional abatement.
Discovering asbestos, lead, or other hazardous materials in your building envelope can stop renovation or maintenance work in its tracks. The first thing you might think is, “There goes the schedule, there goes the budget!” While a discovery like this is never good news, there are ways to minimize disruption to the project while keeping the site and the people working on it safe.
Two approaches to hazardous materials abatement.
When it comes to asbestos or other hazardous materials, you can plan ahead and budget for abatement as part of your tender process, or chance it and potentially face a scenario where hazardous materials are discovered mid-renovation. Understanding what to expect in both situations helps you stay compliant, protect workers, and keep your project on track.
Scenario 1: Planning ahead
1. Early hazardous materials assessment
Before tendering the project, a hazardous materials survey (a “HazMat report”) is conducted by a qualified consultant. This will identify any asbestos-containing or dangerous materials and describe their locations, quantities, and condition.
2. Informed project scope and pricing
With the HazMat report in hand, contractors can accurately estimate abatement costs and build them into their bids. This ensures a level playing field for tendering and helps avoid unexpected budget overruns later.
3. Coordinated scheduling
Knowing that materials need to be removed allows you to plan abatement before general demolition or renovation begins. This helps keep workers safe and can prevent costly project delays.
4. Compliance and documentation
Because abatement is part of the planned workflow, all the required permits, notifications, and safety documentation can be figured out in advance.
5. Less headaches and predictable costs
By addressing asbestos early, you minimize the risk of work stoppages, emergency remediation, and dangerous exposure incidents. The project stays on schedule and on budget.
Scenario 2: You didn’t plan for an ugly discovery.
Not ideal, of course, but it happens all the time. Once hazardous materials are found, the next steps are all about safety: work has to stop, the area is sealed off, and professionals are brought in to assess and remove the risk properly. A short pause now keeps your team protected and your project on track in the long run.
The first 24 to 72 hours: What to do first
When asbestos, lead, or another hazardous material turns up in the middle of your project, the first few days are crucial. Now is the time to keep your head and act quickly, but calmly. This will help keep everyone safe and will limit further disruption to the work. Here’s how to handle those first critical steps.
1. Stop work immediately
As soon as someone has raised a reg flag or has a suspicion about the presence of a hazardous material, all work in the area, intrusive or not, must stop. Do not touch or attempt to move the materials. That means no more grinding, sanding, or cutting in the affected area. Rope it off, keep people out, and make the switch from a “get it done” mindset to a “keep it contained” one. The more these materials get disrupted, the worse the cleanup can get.
2. Keep calm, and document the discovery
Now that work has stopped, take clear photos or short videos to record what’s been found. Make note of where in the building the material was discovered, who found it, and what kind of work was happening at the time that revealed it. This kind of documentation will help determine the extent of the problem, guide next steps, and protect everyone involved.
3. Notify the right people
First, make sure everyone involved is made aware of the situation, starting with the team on site, including site supervisors, owners, and property managers.
Bring in a qualified HazMat Consultant
An independent hazardous materials consultant will create a comprehensive sampling plan, take bulk samples, and send them to a certified lab for accurate testing. From there, you’ll receive a report detailing what was found, the level of risk, and further recommendations for proper abatement.
Control and contain
Until the test results are finalized and the abatement work begins, the goal is to stabilize the area and contain the spread of any hazardous materials, dust, or debris. Cover or encapsulate the area if it’s safe to do so, restrict access with clear signage, and carefully control dust and airflow to prevent any accidental spreading of the materials to the surrounding areas.
Getting back on track
Once abatement is complete, you’ll need to notify WorkSafeBC to have the work approved. Before any other work is done, a qualified asbestos professional must be hired for an inspection, and a Notice of Project (NOP) must be submitted to WorkSafeBC.
Think you might have stumbled upon hazardous materials during construction or renovation? Here’s what to do:
- Stop all work in the immediate area and areas that might be related
- Record and document the materials and conditions (no disturbance)
- Notify owners, managers, and safety authorities (WorkSafe BC)
- Call a qualified HazMat consultant for testing
- Secure, label, and isolate the affected space
It’s better to know…
It’s often keen observation, gut instinct, and good communication that help identify the presence of hazardous materials in a building exterior; so knowing the warning signs can save you time, money, and serious safety headaches.
The uncovering of a dangerous material like asbestos or lead rarely happens during a well-organized, pre-planned inspection. It’s usually mid-project, when a worker grinds, cuts, or scrapes through an old layer and suddenly realizes something doesn’t look right. An experienced carpenter who’s seen asbestos tape before, or maybe a painter who knows how lead paints react when being removed. Regardless, the best bet is always to deal with it and get on with it.
Looking out for the red flags
An average worker or labourer shouldn’t be expected to be able to identify asbestos or lead by sight, and legally, they shouldn’t guess. But there are some indicators that site managers, foremen, and experienced tradespeople can learn to recognize and be aware of:
- Building construction or renovations in BC that occurred before 1990.
- Building materials that look fibrous, chalky, or layered.
- Paint layers or coatings that seem to chip easily or produce a fine dust.
- There’s no record of hazardous materials testing for the part of the building being worked on.
In most cases, if something seems off, the right move is to stop work and have it tested. The actions of turning a blind eye, powering through, or assuming it’s safe are just as dangerous as the hazardous materials themselves.
Think it couldn’t happen on your site?
(Guess what—it happens all the time, even in newer buildings.)
Pro Tip: If there’s any chance old materials are hiding beneath the surface of your building, get them tested before the work begins. A quick lab test before schedules have been planned out and crews have begun work can prevent costly shutdowns (and a lot of stress) later.
How hazardous materials often get discovered on building envelopes
1. Renovations or repair work
Renovations to a building envelope are, by nature, somewhat invasive, which is why they are by far the most common scenario where hazardous materials are discovered. A painter, carpenter, or maintenance worker begins sanding, cutting, or grinding an old surface, and there’s something that raises concerns about one of the many materials used when the building was constructed.
But it’s better to know what’s there, so it can be dealt with safely and effectively.
Common sources of exterior hazards:
At a glance: What to look out for:
- Lead in old coatings, paints, and metal trim.
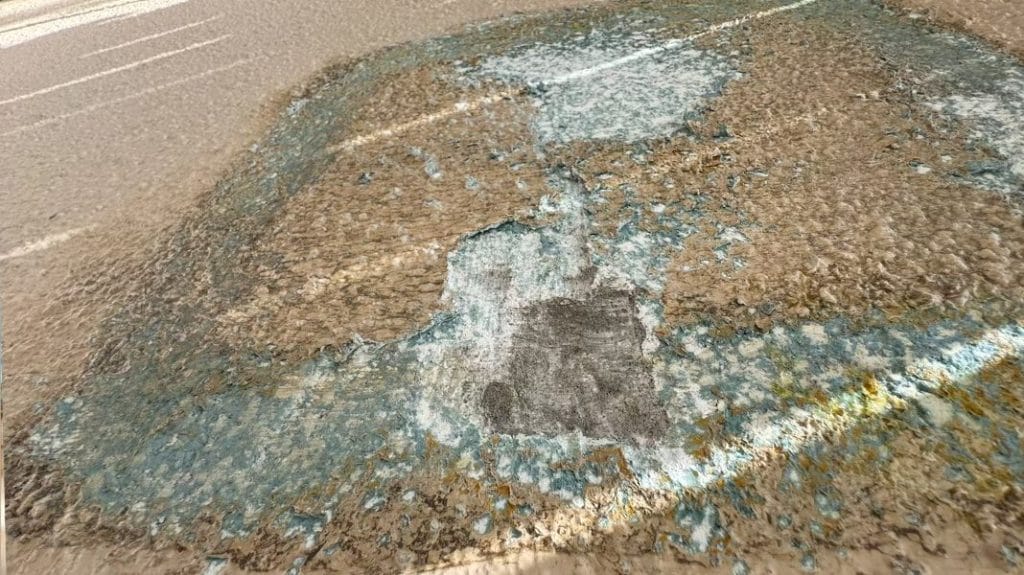
- Asbestos in old stucco, siding, roofing shingles, mastics, cements, and sealants.
- PCBs can be present in old sealants and even old fluorescent light fixtures
- Mold infestations on the inside of the sheathing after years of leaks or water ingress.
- Asbestos was often used in window putties, caulking, and other sealants around exterior joints and openings.
- Pre-1990s construction or renovations
- Multiple, unusually thick or brittle paint layers
- Brittle cementitious finishes
- Previous “mystery” patches applied to exterior surfaces.
- The material beneath finishes, such as insulation, drywall mud, or tile backing that looks fibrous or “hairy,” which can indicate asbestos.
2. Removing or demolishing building materials
If workers start removing old cladding, siding, or flooring and notice layers of older materials underneath, that’s often when asbestos or lead is uncovered. Many older buildings have been “renovated over” multiple times, so the original hazardous layer can be hidden beneath newer finishes.
3. During building envelope work
Hazmat findings are also common in building renewal projects, especially when restoring concrete, replacing membranes, or re-coating façades.
Older caulking, mastics, and waterproofing materials sometimes contain asbestos, while exterior paints and primers can contain lead.
4. Through routine maintenance or testing requirements
In some cases, a building inspection, restoration plan, or WorkSafeBC requirement triggers sampling before work even begins. For example, strata or property managers often order a Hazardous Materials Survey before tendering a large project to prevent costly mid-project discoveries.
Testing & Reporting: What to expect from your HazMat consultant team
Once the dust settles (figuratively speaking), treat your hazmat consultant as though they’re your new best friend. Their job is to provide you with a clear and complete picture of what’s going on in your building. No guesswork, no half answers. Here’s what to expect:
Scope of survey
They’ll start by mapping out exactly where on the building the samples were taken and what materials were tested. This can include exterior cladding, coatings, and sealants, as well as interior drywall and insulation. The report they provide should outline the lab methods used and confirm that testing followed proper chain-of-custody procedures.
The Report
This is your roadmap for proceeding through the next stages of safe abatement and the continuation of your project. In the report, you’ll get a clear table showing which samples tested positive or negative, along with the associated risk levels of each finding. In this report, your consultant will also outline your options, like full removal, partial removal, or encapsulation (when a material is safely and permanently sealed away rather than being removed).
A good report may even include a preliminary abatement spec or performance requirements for contractors to follow.
Worried about time?
Getting a HazMat report in BC typically takes about 3-4 business days after the inspection is completed (though timelines can vary). The inspection itself may take a few hours or more, depending on the size of the building, and then the lab analysis can add to the total turnaround time. In urgent cases, especially when asbestos is suspected, some consultants can provide same-day results to help you move quickly and safely.
Keep a paper trail
You might wonder what to do with all these reports and findings. Our advice: keep all of it. This includes the survey, lab results, drawings or mark-ups, and that all-important chain-of-custody documentation. These records are your proof of due diligence and will guide any future maintenance or renovation work safely.
Finding the right Abatement Contractor for asbestos removal
When hazardous materials are confirmed, your next move is bringing in the right abatement team. But where do you start? The contractor you want is one with the credentials, controls, and communication skills to handle your job safely and efficiently.
We’ve put together a quick checklist you can copy, share, or build into your contractor selection process.
Quick checklist for selecting an abatement contractor
Before anyone sets foot on-site, confirm that the contractor you’re considering:
- Holds the proper license or classification for hazardous material abatement in BC or your jurisdiction.
- Has a proven safety record (TRIF/LTIR), active WorkSafeBC clearance, and carries full insurance and bonding.
- Can provide certifications for their supervisors and their crew.
- Willing and able to provide references and examples of recent, comparable exterior projects.
Getting ready for an RFP or RFQ
- Can provide photos, addresses, and sample paperwork such as work plans, air monitoring reports, etc.
If you’ve narrowed down your search, it’s time to make an RFP (Request for Proposal) or an RFQ (Request for Quote). This is where you dig a little deeper to understand how they’ll approach the work:
- What approach and controls will they use for working at height or on exposed facades?
- How will their schedule coordinate with the building envelope or painting scopes?
- How do they handle contingency pricing for things like unexpected discoveries or quantities of hazardous materials that are more than expected?
- What kind of tenant communication plan do they have? For instance, how do they address issues including noise, dust, and complaint response protocols?
Reg Flags to watch for
Keep your eyes open for contractors who might take shortcuts or make omissions that could put your project (and liability) at risk:
“We can just include it under the painter’s scope.” (This is never compliant.)
No mention of third-party clearance testing or air monitoring.
They provide suspiciously low pricing with no mention of mobilization, containment, or disposal costs of hazardous waste.
Choosing the right approach to abatement
Once you have a report that confirms what you’re dealing with, the next big question is how to deal with it. The best approach depends on the type of material(s) found, where they’re located, and how much of a problem they are likely to be in the future. Here are some of the factors you’ll need to consider:
Removal vs. Encapsulation
As the name suggests, removal is the complete elimination of the hazardous materials so they’re gone for good. It’s the most thorough option, but can also be the most disruptive and expensive, especially on exteriors where coatings, sealants, or siding may need to be removed and replaced.
Encapsulation involves safely sealing or covering up the hazardous materials so that fibres or dust can’t escape. It’s often a strong choice when the material in question seems to be stable, in good condition, and not prone to weathering, abrasion, or degeneration. Encapsulation is an approach that can save time and money, but it requires consideration, regular inspection, and maintenance over the long term.
Controlling the situation
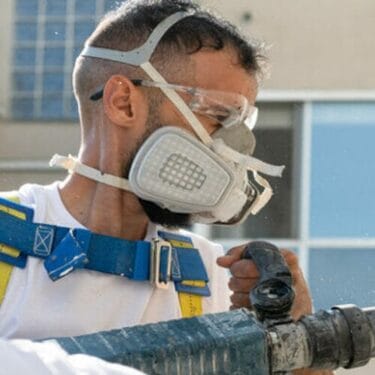
Exterior abatement can have its own set of particular challenges. Factors like wind and rain, adverse temperatures, gravity, and even proximity to pedestrian traffic can all affect the control measures used. Look for contractors who use proven abatement controls and established safety protocols like containment systems to keep debris from spreading, negative air or HEPA filtration (where practical), wet removal methods to keep dust down, and proper protection for crews.
*BC Weather matters: abatement shouldn’t happen in high winds or heavy rain.
Clearance & Verification
When the abatement work is done, a third-party consultant should confirm the site is safe (typically this is the same independent HazMat consultant who did the initial testing and reporting).
This usually involves a visual inspection of the area and air monitoring to verify that no fibres or dust remains. You should also receive waste manifests showing that all hazardous materials were disposed of legally at an approved facility.
What could all this cost?
Let’s be honest here, hazardous materials abatement isn’t what you want to spend money on, and it’s not cheap. But with a realistic sense of costs, you can at least plan your budget accordingly and avoid (more) surprises later. The figures below are based on typical building envelope projects in British Columbia, though structures and pricing models tend to be similar across other provinces or jurisdictions.
The Upfront Costs
Before any abatement work begins, you’ll need to pay for proper testing and analysis to understand exactly what you’re dealing with. Here’s what to expect:
- HazMat survey (small exterior scope): $1,500 – $5,000
- Bulk lab analysis (per sample): $50 – $150
Materials Abatement
Once the presence of hazardous materials has been confirmed, abatement costs can vary depending on the materials found, the complexity of access and methods of removal or abatement. Below will give you a rough idea of what you should budget for:
- Lead paint removal (exterior components): $8 – $20 / sq ft
- Removal of asbestos-containing stucco or parging: $15 – $35 / sq ft
- Sealant removal/replacement where ACM or lead is present: $12 – $25 / lin ft
- Mobilization, site set up, and containment: $2,000 – $8,000 per mobilization
- Third-party air monitoring and clearance work: $1,500 – $4,000 per phase
- Waste handling & disposal (profile-dependent): $300 – $1,200 per bin or load
Factors that can significantly affect cost
Every building and situation is unique, but the following on-site factors often influence pricing more than the hazardous material itself:
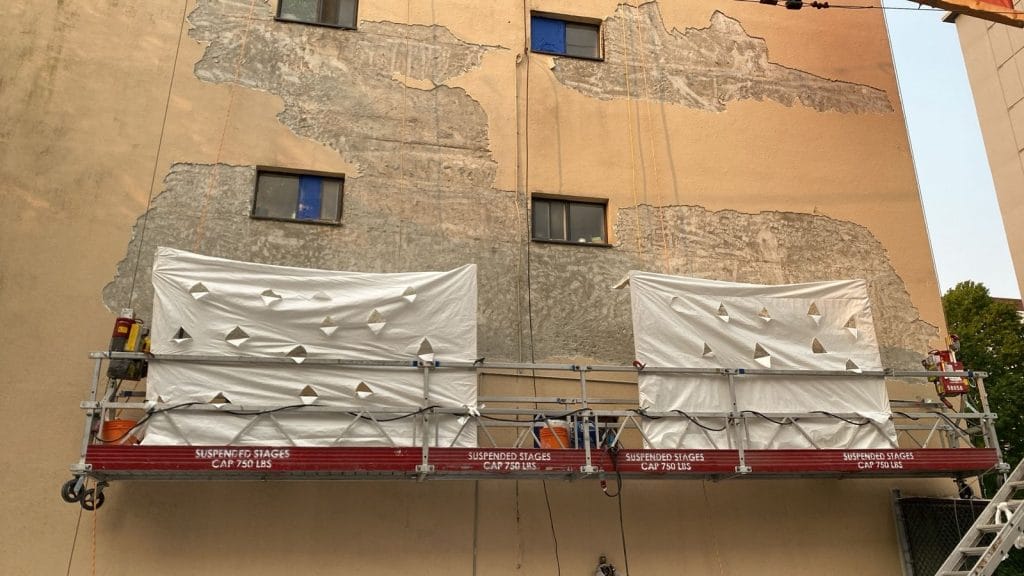
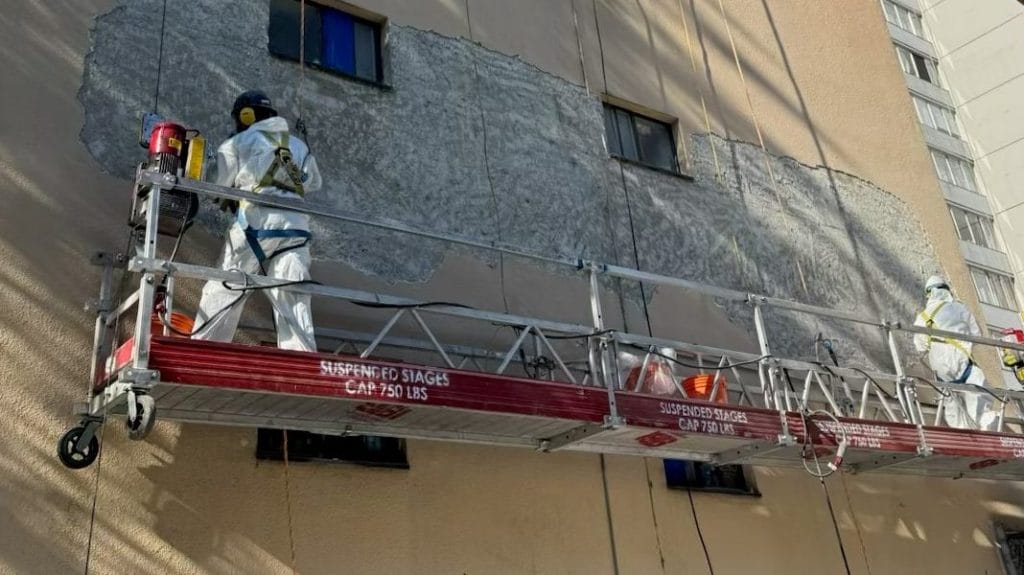
- Access and height issues (does the job require swing stages, boom lifts, scaffolding, or rope access)
- Seasonal weather concerns and environmental controls. Abatement work can only proceed under safe weather conditions (usually dry, low-wind days). Crews also need proper containment and dust-control measures to protect nearby areas.
- Scope growth once existing conditions are exposed – what else might be found?
- Traffic or tenant constraints, which can limit working hours, require extra coordination and safety precautions.
- Waste classification and disposal profile
- Number of mobilizations (how many times the contractor has to set up and tear down their equipment, like scaffolding, containment systems, etc, between different areas, elevations, or buildings.
Scheduling overview
Hazardous material discovery doesn’t just affect cost — it can also change your project timeline. Knowing what to expect helps you plan, avoid additional disruptions and downtime, and keep other trades moving.
Here’s what to expect as you navigate the first
Survey & lab reporting: Expect anywhere from 3 to 10 business days for the report to come back
- Regulatory notifications or permits (if required): 2 to 10 business days
- Abatement process and execution: The hard work of abating the hazardous materials can typically add 1–3 weeks to the project, depending on the size of the project, scope of work, and what materials are being removed.
- Clearance & documentation: 1–3 days once abatement is complete.
Sequencing and scheduling tips
- Test early! If there’s any chance there might be something ugly hiding under the surface, schedule a HazMat survey during planning and preconstruction, not after crews are mobilized and work has begun.
- Bundle smartly. It’s possible to combine material abatement with access setup (like scaffolding or swing stages) to avoid repeat mobilizations.
- Work in stacks. Stage work by elevation or building face so that painting, cladding, or repair crews can begin or continue on another part of the project while abatement is underway.
Developing a solid communication plan
When hazardous materials are discovered, clear and calm communication is paramount. A calm, confident plan keeps everyone informed and reduces unnecessary confusion or panic.
Who needs to know how to communicate?
After on-site teams have been informed, start with the people directly affected, like tenants and occupants, property owners, or strata councils, and in some cases, your neighbours in adjacent buildings if containment procedures might extend beyond your site.
Clearly explain what was found, what is being done about it, and how everyone’s safety is being managed. Reassuring, fact-based communications go a long way in maintaining trust. Key points to include:
- The expected timeline for testing, cleanup, and continuation of the original project
- Hours of abatement work and any likely noise or other impacts
- Discuss possible temporary access restrictions
- Who can they contact with any questions or concerns?
How to Share Information
Use multiple channels to keep everyone informed. Lobby or elevator notices, door-to-door notices, email updates, and even QR codes linking to a project microsite. Consider regular weekly updates that show that the project is under control and progressing safely.
Complaints & Escalations
Take the time to set up a simple process for capturing and addressing concerns. (This is something you should be able to set up with your contractor or abatement team.) Maintain a logbook or digital record of any concerns, respond within 24 hours, and have clear thresholds defined for pausing work if safety or communication issues arise.
A well-managed communication plan will keep the abatement phase of your project on schedule and your relationships with tenants in good standing.
Risk Management: Before, during, and after
As you might see, things can change quickly in this kind of situation. The best abatement projects run on good planning. A clear risk management process helps you anticipate problems, react quickly, and document everything for future reference.
Common risk scenarios (and smart ways to deal with them)
- Bad weather during containment. Have a thoughtful tarp plan ready and inspect it daily. Temporary containment needs to stay watertight even through rain or wind.
- Elevated dust at the property line. Add dust monitors or misting systems if possible, and adjust work methods immediately if you need to.
- Unexpected quantity growth. Keep in mind you might run into more materials than were expected. Keep pre-approved unit rates and a clear contingency budget in place to prevent delays or disputes.
By identifying these risks early, you turn potential emergencies into manageable tasks.
Document a job well done
When the abatement work wraps up, your final file should include:
- Clearance reports and lab results that confirm the site is safe
- Waste manifests and disposal records for regulatory compliance
- Drawings or markups that clearly show treated areas
- Operations & Maintenance notes are handy for future reference
These records help protect everyone, including owners, contractors, and occupants, and help to ensure future maintenance is smoother and safer.
Making smart abatement decisions
When encapsulation makes sense
Use encapsulation when the substrate is stable and the area isn’t likely to be disturbed again soon. It’s faster and less expensive, but requires future management and documentation.
Full removal (when it’s worth your while)
Choose full removal if the materials will need to be accessed again—such as for window or sealant replacement—or when you want to eliminate future liability. It may cost more now, but it pays off over the building’s lifecycle.
Coordinate with (and consider) other upgrades
Consider other envelope upgrades while the abatement work is happening. It’s the perfect opportunity to replace aging sealants and membranes, or address found leaks while the access is open.
Quick Checklist: What to do if you discover lead or asbestos in your building envelope.
Use this as a step-by-step guide before you begin renovations, or as soon as hazardous materials have been discovered on your site.
- Pause work and restrict access
Keep everyone clear of the affected area until testing is complete.
- Find a qualified consultant and approve a sampling plan
They’ll take samples, send them to a certified lab, and prepare a report.
- Receive your survey and lab results
Confirm what materials are affected and where they’re located.
- Prequalify your abatement contractor
Check credentials, safety record, and references before awarding the job.
- Select your abatement method
Decide whether you should remove or encapsulate – based on risk, cost, and long-term plans.
- Submit notifications and permits
Make sure WorkSafeBC (or your local authority) is informed before work begins.
- Notify your tenants and neighbours
Share what’s happening, when, and how safety is being maintained.
- Set up containment and prepare
Install barriers, signage, and dust-control measures before starting abatement.
- Maintain air monitoring and daily logs
Confirm controls are working and keep documentation up to date.
- Get clearance and file waste manifests
A third-party consultant should verify that the site is clean and safe for re-entry.
- Resume your envelope work and update as-builts
Integrate the work and findings into your project documentation for future reference.
FAQs
- Do we have to tell the tenants?
Yes. Transparency builds trust and is often required when work could affect air quality or access. It’s usually pretty obvious when abatement work is underway. Keep the messaging factual and calm.
- Can my painter or general contractor handle this?
No. Only licensed abatement contractors can legally remove or handle hazardous materials. Painters or general trades can return to work only once clearance is confirmed.
- Is air monitoring really necessary for exterior work?
Yes. Especially in densely populated or pedestrian areas. Air monitoring verifies controls are working and protects you from liability.
- What if it rains during abatement?
Abatement should pause. Rain and wind can compromise containment and spread debris. Your contractor should have a “weather window” plan in place.
- Does insurance cover this?
Sometimes. Coverage depends on your policy, the nature of discovery, and whether due diligence was followed. Check with your broker early.
- How can I avoid this next time?
Schedule a HazMat survey before planning any building envelope or renovation work. Early testing prevents shutdowns, change orders, and added costs later.
*Note: This article is for informational purposes only. Always follow local regulations and consult certified professionals such as your provincial safety authority or WorkSafeBC before taking action. This is not legal advice.
If your project has (or might) come to a halt due to the discovery of hazardous materials, remember – abatement doesn’t have to derail your project. It just takes the right plan to get through it and the right partners.
Whether you’re scheduling regular renovation or maintenance work, aware of hazmat issues, or just trying to avoid surprises, we can help you make confident, well-informed decisions.
Book a 20-minute call with us to relieve stress and keep your plan on track before you hit go. A short check-in with our team can help you spot risks before they become delays, and turn unexpected surprises into a step towards a smoother project.
Request your custom HazMat consultation today
Find out why strata councils, property owners, and managers rely on WCP for expert hazardous materials assessment, abatement planning, and safe building envelope work.
Our projects are backed by strict safety compliance and proven protocols, so you can rest easy knowing that your property and the people in it are well considered and protected. With our experienced project management team, we minimize disruptions while ensuring the work is done thoroughly and correctly.
Get in Touch
For more information on hazardous materials surveys, abatement planning, and building envelope services, email us at: [email protected] or call 604-420-5552.
Protect your property and plan with confidence. Reach out today for a free, no-obligation consultation.